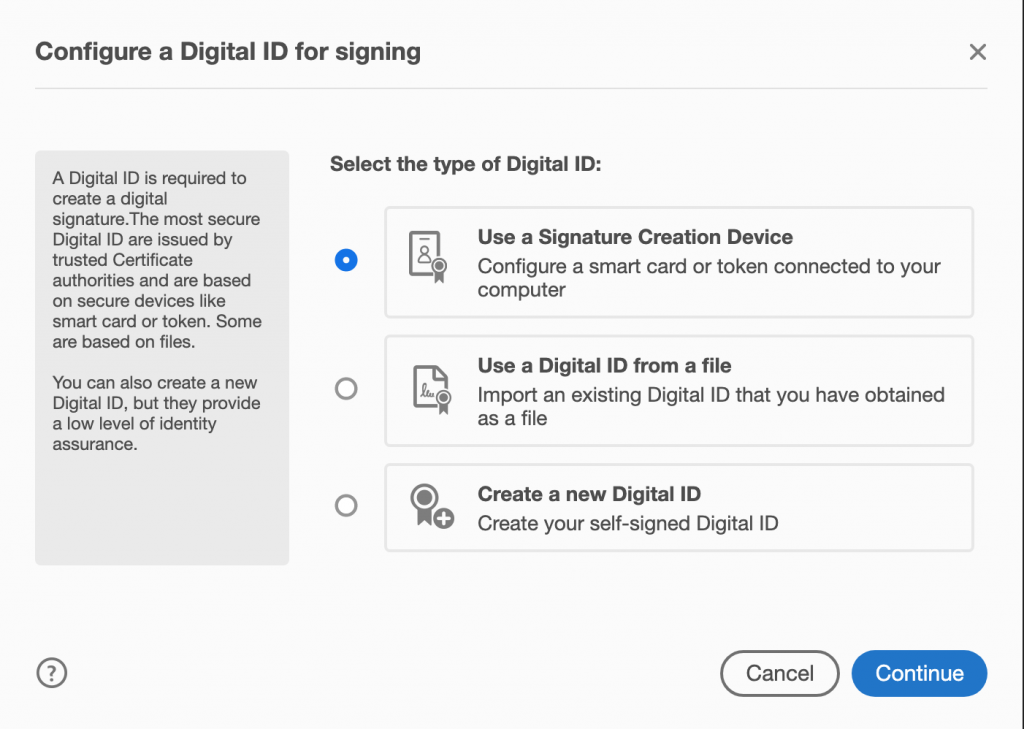
- Select Lines
- Type Shift + Option + I
- You’ll get multi line cursor. Perform multiple edits at the same time.
Sublime – Multi Line cursor keyboard shotcut
- Select Lines
- Command + Shift + L on macOS
I came I saw I messed up
This is a working code for Bitly using v4 API to shorten a long URL. You can also create a copy of this sheet and bulk create bitly links using the function bitlyShortenUrl in the 3rd column- https://docs.google.com/spreadsheets/d/1TS-aQcDu3rRv-LexEoIqDiX0ydv69ijkXQP-nuQdBz4/edit#gid=0
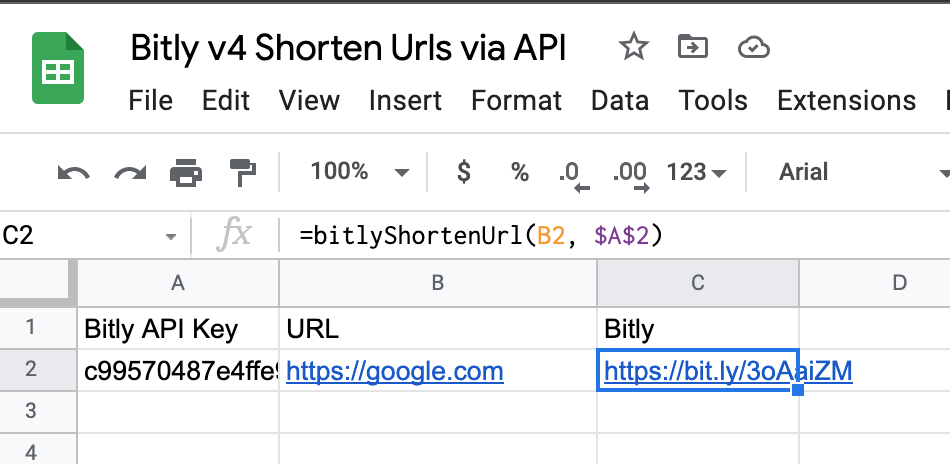
function bitlyShortenUrl(longLink, accessToken) {
  var form = {
    "domain": "bit.ly",
    "long_url": longLink
  };
  var url = "https://api-ssl.bitly.com/v4/shorten";

  var options = {
      "headers": { Authorization: `Bearer ${accessToken}` },
      "method": "POST",
      "contentType" : "application/json",
      "payload": JSON.stringify(form)
  };
  var response = UrlFetchApp.fetch(url, options);
  var responseParsed = JSON.parse(response.getContentText());
  return(responseParsed["link"]);
}
PS: Bitly access token details given here https://support.bitly.com/hc/en-us/articles/230647907-How-do-I-generate-an-OAuth-access-token-for-the-Bitly-API-
On your OnePlus phone:
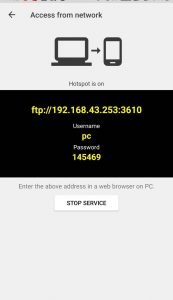
On your Macbook:

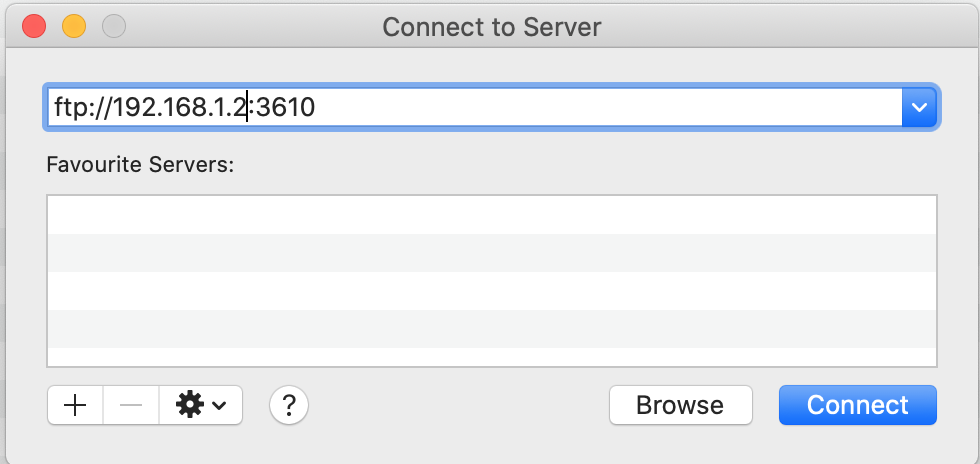
On your Mac

find . -name .DS_Store -printf \"%p\"\ \ | xargs rm

15 1 * * * root find / -name ".DS_Store" -depth -exec rm {} \;
Here are a common git commands that I end up using pretty frequently. Will keep on updating this list
Simplest is git branch -a Shows all remote and local branches. git branch -r Will show all remote branches only.
Another way is to use git remote feature like:
git remote show origin This shows all branches on remote and how they corelate with local repo.
git ls-remote Will meticulously list all branches and tags.
git diff --name-status master..branch Will list out only filenames git diff master..branch without –name-status will show whole diff.
git remote -v Displays url of remote repo from where local git was pulledAlternatively use git remote show origin or git config --get remote.origin.url
git log origin/master..HEAD
To view diffs: git diff origin/master..HEAD
Another way: git log @{u}..
Online job search portals are flourishing in India. However it turns out that some job portals have totally sold their conscience and pay no respect to user’s privacy and trust. One such lame job portal is timesjobs.com. The retards in this company carelessly sell user’s email and phone to nuisance creating spammers, breaching all privacy policy clauses as laid down on their own website. These nasty spammers, in turn send useless crap about lottery, and hoax job offers.
To expose their scandal, I registered on timesjobs.com via a separate email id specially made for timesjobs. Soon I started receiving spam messages. When I analysed headers in the original email, it officially proved that messages were sent to timesjobs id.
I have sent an email to their corporate office as well.
To: corporatecare@timesgroup.com
Hi,
I recently realized that timesjobs is illegally selling private information like phone numbers and email addresses to spammers and marketeers. I have attached a snapshot which proves this. It is a clear breach of the privacy policy as mentioned here: http://www.timesjobs.com/popuphtml/privacy.html.
Let me know what explanation you have for this.
-Prakhar
I am trying to find a legal aspect to sue these guys. If anyone is aware of this process, kindly let me know. In the meantime, request you to tweet and digg this post so that timesjobs can learn some lesson.
Just yesterday, I was signing up for a LIC Jeevan Saral plan. I needed to perform some quick calculation to select the best recurring deposit (RD), based on ROI. I tried searching for some good online utility which can serve the purpose. To my surprise, out of several available online calculators, there was not a single one which was presentable enough. None of them provide breakup details etc. I decided to create one myself and make it publicly available so that others can use it as well.
Features:
Loan EMI calculator: https://prakhargoel.com/projects/calculators/emi_calculator.php
Annual Recurring Deposit Calculator: https://prakhargoel.com/projects/calculators/annual_recurring.php
Monthly Recurring Deposit Calculator: https://prakhargoel.com/projects/calculators/monthly_recurring.php
Here’s a list of common commands I use in Linux. I will continue to update this list with more stuff.
[code lang=”bash” gutter=”false”]
cat /var/log/appfirewall.log
# You will see stuff like
Jun 21 10:37:51 prakhars-MacBook-Pro Firewall[90]: postgres is listening from 0.0.0.0:5432 proto=6
Jun 21 10:38:11 prakhars-MacBook-Pro Firewall[90]: mysqld is listening from ::ffff:0.0.0.0:3306 proto=6
Jun 21 10:40:21 prakhars-MacBook-Pro Firewall[90]: Dropbox is listening from 0.0.0.0:17500 proto=6
Jun 21 10:40:21 prakhars-MacBook-Pro Firewall[90]: java is listening from ::ffff:0.0.0.0:0 proto=6
Jun 21 10:44:38 prakhars-MacBook-Pro Firewall[90]: GoogleTalkPlugin is listening from 127.0.0.1:49198 proto=6
Jun 21 10:45:35 prakhars-MacBook-Pro Firewall[90]: python is listening from 127.0.0.1:8000 proto=6
[/code]
screen command: Use it to create parallel sessions in terminal. Useful for running long processes on remote servers even after signing out of server.Usage:screen -ls
#lists all attached/detached screens IDs
screen -x 13152
# Enter (Attach) screen ID 13152 (just an example, can be any ID number)
echo $STY
# Displays current screen ID you are working in.
[/code]
Ctrl-a d Detach from current screen.
dpkg --get-selections List all installed packages. (Only on debian systems like Ubuntu which support apt-get)dpkg --get-selections | grep mysql
This is a fast forward tutorial which will guide you through django installation on virtualenv. Detailed installation instructions using source codes can be found on respective package’s official site.
Pre- Requirements:
Make sure you have easy_install on MAC
Install pip using easy_install pip
[code lang=”bash” gutter=”false”]
pip install virtualenv
pip install virtualenvwrapper
# Use a text editor to edit .profile and Insert following lines. Eg using vim:
# $ vim .profile
export WORKON_HOME=$HOME/.virtualenvs
export PROJECT_HOME=$HOME/Devel
source /usr/local/bin/virtualenvwrapper.sh
# Now open a new terminal window and Type:
mkvirtualenv myfirstproject
# You will see something like:
(myfirstproject) $
# This means you are now working isolatedly in myfirstproject
# The location of this project is ~/.virtualenvs/myfirstproject
[/code]
[code lang=”bash” gutter=”false”]
# [info] Make sure you are inside myfirstproject:
# $ workon myfirstproject
# Now run in terminal:
pip install Django
pip install south
# This installs Django in: .virtualenvs/myfirstproject/lib/python2.6/site-packages/django/
[/code]
workon myfirstproject if you are not already in your virtual environment.cdsitepackageswhich django-admin.pydjango-admin.py startproject mydjangoprojectpython manage.py runserver Default port is 8000. If you have to change port, just write port number after runserver